How to secure Apple and Android mobile devices using 802.1X

When connecting to an enterprise-secured network with Android devices, users are prompted with many settings that could be confusing. When connecting with iOS devices—an iPad, iPhone, or iPod Touch—users are typically only prompted for their username and password. They can’t edit the advanced 802.1X settings on the device, but there are ways to get around this.
Installing certificates in Android
If you’re using a certificate-based authentication method, such as TLS, you must first install the user digital certificate.
Even if you aren’t using certificate-based authentication, you may want to load a certificate on Android. For most authentication methods, you can optionally install the certificate from the Certificate Authority that the authentication server uses to enable server verification. Like the server verification in Windows, it can help prevent man-in-the-middle attacks.
Digital certificates are small files with an extension such as .p12, .pfx, or .crt.
+ ALSO ON NETWORK WORLD: HOW TO SET UP 802.1X IN WINDOWS NETWORKS +
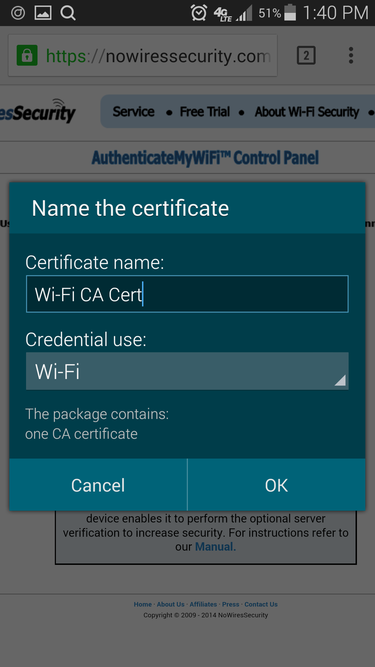
In newer versions of Android, installing certificates is simple. Download the certificate and it will automatically open the screen to import it. Give the certificate a name and select Wi-Fi for the credential use. If lock screen security isn’t enabled on your phone, you may be prompted to enable it.
If using an older version of Android, you may have to manually start the import process. First, download or transfer the certificate onto the device. Then go to the Security or Location & Security settings and choose Install from SD card. If you haven’t already, it will prompt you to create a password for credential storage.
Keep in mind, you can always remove certificates that you’ve installed by going to the security settings and selecting Clear credentials, which then will allow you to remove the lock screen PIN/password in newer Android versions, if you desire. However, that will remove all the certificates you’ve added. If you want to remove user certificates, select Trusted credentials from the security settings and select the User tab to view and delete the individual certificates.
Configuring the 802.1X settings in Android
Once you connect to an enterprise-secured Wi-Fi network in Android for the first time, you will see a page of authentication settings. Though they can appear daunting to some users, there’s usually only two required fields: Identity (username) and Password.

If the correct EAP method isn’t already selected, select the method supported by the authentication server, such as PEAP, TLS, TTLS, FAST, or LEAP. Then for most EAP methods, you can optionally specify the CA certificate, which you must first install as discussed in the previous section. For TLS, you can also specify the user certificate; again the certificate must already be installed.
Here are the settings you will find when using the PEAP or TTLS methods:
- Phase 2 authentication: This specifies the outer authentication method, such as MS-CHAPv2 or GTC. Use the one supported by the authentication server, keeping in mind that MS-CHAPv2 is the most popular. If you’re unsure, try selecting None.
- Identity: This is where you enter the username, which could include a domain name, such as jsmith@company.com, depending upon the particular network.
- Anonymous identity: By default, the username (identity) is sent twice to the authentication server. First, it’s sent unencrypted, called the outer identity (Anonymous identity), and then secondly inside an encrypted tunnel, called the inner identity. In most cases, you don’t have to use the real username on the outer identity, which prevents eavesdroppers from discovering it. However, depending upon your authentication server you may have to include the correct domain or realm.
I recommend using a random username, such as “anonymous” for the Anonymous Identity. Alternatively, if the domain or realm is required: “anonymous@domain.com”.
- Enter password: Of course, this is where you input the password associated with the username you’ve specified.
You can always edit these settings in the future. Simply long tap the network name and select Modify network config.
Installing the certificates on iOS devices
Like with Android, iOS or any device for that matter, you must first install a user digital certificate if using a certificate-based authentication method, such as TLS.
However, with iOS devices, you don’t have to manually install the Certificate Authority certificate when using other EAP types, such as PEAP, in order to take advantage of the server verification. This verification helps prevent man-in-the-middle attacks and is automated with iOS devices, since it will prompt you to accept new certificates used by the authentication server.
On the other hand, this default type of verification is easily bypassed/ignored by users; they’ll likely just accept new certificates. Thus it’s a good idea to define trusted certificate names by creating configuration profiles, which I discuss in the last section.
If your authentication server requires a user certificate, email or transfer it to the iOS device. The certificate will be a small file with an extension such as .p12, .pfx, or .crt. Select the certificate file on the iOS device and it prompt you to install it.
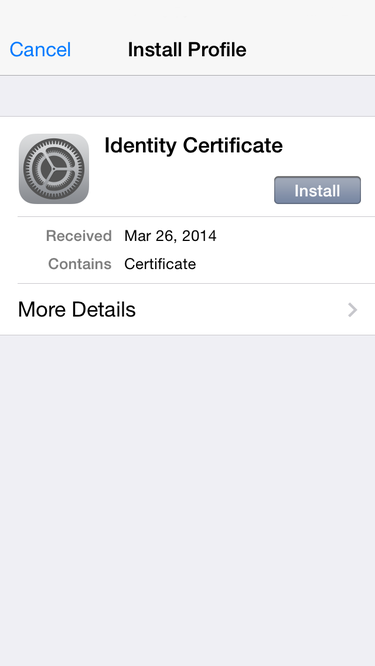
You can tap More Details to see all the certificate details to verify its legitimacy. Then tap Install to import the certificate. If your device has a PIN or passcode set, you’ll likely have to enter it.
Connecting with iOS devices
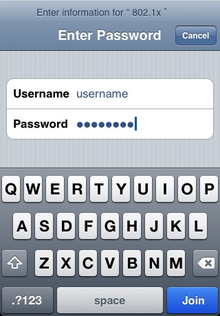
When connecting to your enterprise-secured wireless network with an iOS device for the first time you’ll be prompted for the authentication settings. When the network is using password-based authentication, such as PEAP, you simply enter the username and password.
Next, you will likely be prompted to accept the authentication server’s Certificate Authority certificate. You’ll see the domain and Certificate Authority name associated with the certificate. It will likely show “Not Verified” the first time you connect. You can see the expiration date of the certificate as well, and also tap More Details to see all the certificate details to verify its legitimacy.
Configuring advanced 802.1X settings of iOS devices
On iOS devices themselves you can’t configure the advanced 802.1X settings, such as exact EAP types allowed, trusted certificate names, and enabling Protected Access Credential (PAC). Also not available is the ability to define the Outer Identity, like the Identity Privacy in Windows and Anonymous identity in Android, which allows you to disguise the username when it’s sent over the network the first time in clear text. The same applies to Apple computers running Mac OS X 10.7 Lion or later; you can’t natively configure the advanced 802.1X settings.
However, you can use the Apple Configurator (for Mac OS X) or iPhone Configuration Utility (iPCU) (for Mac OS X and Windows) to create a network configuration profile that you can distribute and install on iOS devices (and Mac computers), which can include user and Certificate Authority certificates as well.
The Apple Configurator lets you do everything the iPhone Configuration Utility (iPCU) does. Both include the ability to configure advanced 802.1X settings in addition to device security policies and other network-related settings, such as general Wi-Fi, VPN, Exchange account, and email settings. However, the Apple Configurator includes even more functionality, such as specifying apps to install and direct multiple device configuration for those plugged into the computer via USB.
Once you’ve created a configuration profile, you can distribute it to users by email or upload to a website. You could even create a separate SSID on the network with a captive portal pointing to the configuration file so users can quickly and easily download it. You can also connect devices to the computer and install directly using the iPCU.
Eric Geier is a freelance tech writer—keep up with his writings on Facebook or Twitter. He’s also the founder of NoWiresSecurity providing a cloud-based Wi-Fi security service, and On Spot Techs providing RF site surveying and other IT services.

